Friday, November 22, 2024

How to Build a Basic Plywood Rowboat at Home

How to Build a Basic Plywood Rowboat at Home

Building Your Own Plywood Rowboat

Craving the tranquility of paddling across a serene lake or navigating a peaceful river? Building your own plywood rowboat is a rewarding project that blends practical skills with a touch of nautical adventure. This comprehensive guide will walk you through the process, step by step, so you can craft a reliable and sturdy vessel to explore the waters.

Gathering Your Materials

Before embarking on your boatbuilding journey, gather the essential materials:

  • Plywood: Choose marine-grade plywood, preferably 1/2-inch thick, for its durability and resistance to moisture.
  • Boat Plans: Opt for pre-designed plans tailored to your desired boat size and style. These blueprints will provide detailed instructions and dimensions.
  • Wood Glue: Use a high-quality waterproof wood glue for strong bonds.
  • Epoxy Resin and Hardener: Epoxy is essential for sealing the wood and enhancing its water resistance.
  • Fiberglass Cloth: This material, combined with epoxy, creates a durable, watertight barrier.
  • Wood Screws: Use stainless steel screws for longevity and resistance to corrosion.
  • Rowlocks: These metal pieces attach to the gunwales and hold the oars.
  • Oars: Choose oars that are the appropriate length for your boat size.
  • Paint: Select marine-grade paint for a protective and aesthetically pleasing finish.
  • Tools: Equip yourself with basic woodworking tools like a saw, drill, sander, clamps, and measuring tape.

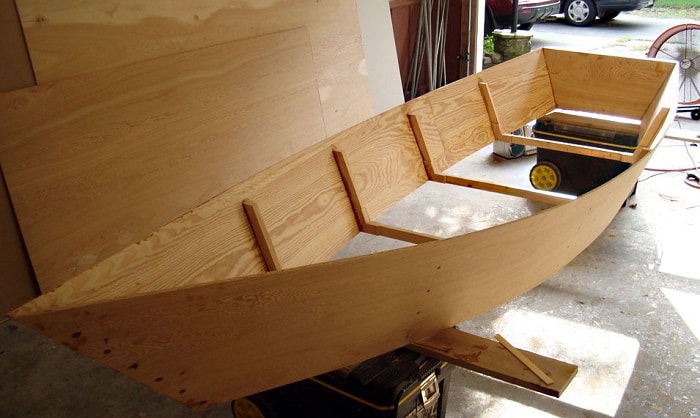
Building the Boat's Framework

Begin by carefully studying your boat plans. The framework, often called the "skeleton," provides the boat's shape and strength. Using the plans as your guide, cut the plywood into the required shapes, ensuring accuracy for a well-balanced boat.

Assembling the Framework

Follow the instructions in your plans to assemble the framework. This typically involves:

  • Gluing and Clamping: Use wood glue to join the plywood sections, securing them with clamps for a strong bond.
  • Screwing: Drive screws through the joints to further reinforce the framework.
  • Verifying Dimensions: Periodically check your measurements to ensure that the framework adheres to the plan's specifications.

Adding Strength with Fiberglass and Epoxy

Once the framework is complete, it's time to enhance its strength and waterproofness. This involves applying fiberglass cloth and epoxy resin.

Preparing the Framework

Before applying fiberglass, carefully sand the surface of the framework to create a smooth, even layer for the fiberglass to adhere to.

Laying Fiberglass Cloth

Cut the fiberglass cloth into manageable pieces, following the dimensions outlined in your plans. Apply a coat of epoxy resin to the framework, then carefully lay the fiberglass cloth on top, smoothing out any air bubbles.

Applying More Epoxy

Once the fiberglass cloth is in place, apply another layer of epoxy resin over it, ensuring that the entire surface is evenly coated. Allow the epoxy to cure fully according to the manufacturer's instructions.

Finishing Touches

After the epoxy has cured, give your rowboat a final sanding to smooth out any rough edges. This step prepares the surface for painting.

Adding Paint

Apply marine-grade paint to the exterior and interior of the boat, providing a protective and aesthetically pleasing finish. Allow the paint to dry completely before moving on to the next step.

Installing Rowlocks and Seats

Install the rowlocks according to the instructions in your boat plans, ensuring they are securely attached to the gunwales. Install the seats in their designated locations, providing comfortable support for the rower.

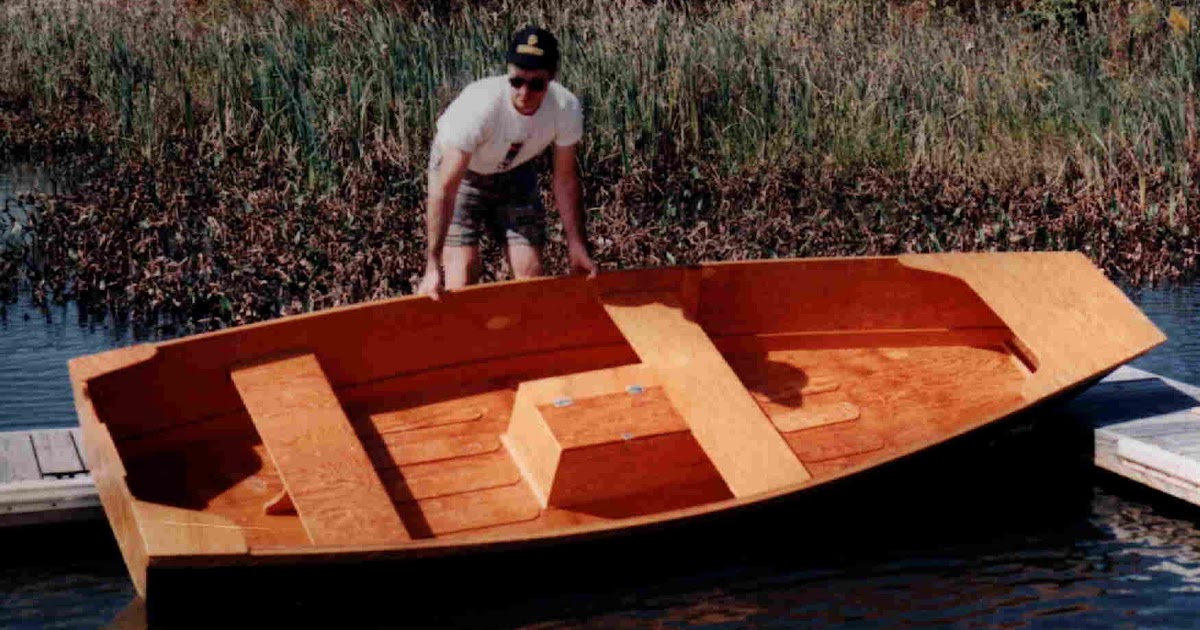
Your Rowboat is Ready

Congratulations! Your plywood rowboat is complete. Take it to a nearby lake or river and enjoy the tranquility of paddling across the water. Remember to always prioritize safety when using your rowboat, and always wear a life jacket.

Building a Wooden Houseboat: Step-by-Step Construction Guide

Building a Wooden Houseboat: Step-by-Step Construction Guide

Building Your Dream: A Comprehensive Guide to Constructing a Wooden Houseboat

The allure of a houseboat beckons many â€" a floating oasis where you can wake up to stunning sunrises and drift away to the gentle rhythm of the water. If you're ready to embark on this exciting journey, building your own wooden houseboat is a rewarding endeavor that blends craftsmanship with aquatic dreams. This comprehensive guide will walk you through each step, from initial planning to the final touches, empowering you to create a unique and personalized floating haven.

Step 1: Planning and Design

Before you start hammering and sawing, meticulous planning is key. This is where your vision takes shape and you establish the foundation for your floating masterpiece.

1.1 Define Your Needs and Preferences

What will you use your houseboat for? Will it be a cozy weekend getaway, a full-time residence, or a vessel for adventurous explorations? Consider the number of people you'll be accommodating, desired amenities (kitchen, bathroom, sleeping arrangements), and the type of waters you'll be navigating.

1.2 Choose the Right Size and Shape

The size of your houseboat is determined by your needs and the regulations of the waters you'll be using. A smaller design may be easier to maneuver and transport, while a larger one offers more space. The shape, be it rectangular, catamaran, or a custom design, impacts both stability and aesthetics.

1.3 Sketch and Refine your Design

Start with rough sketches to visualize your ideas. Consider the layout of rooms, walkways, and the overall flow of your design. Once you have a basic concept, you can refine it using software like AutoCAD or SketchUp. This step allows you to explore different configurations and ensures a functional and aesthetically pleasing final product.

1.4 Consult with Professionals

Don't hesitate to seek advice from professionals. An architect or naval architect can offer valuable insights on structural integrity, buoyancy, and navigation. Consult local authorities to understand building codes and regulations specific to houseboat construction.

Step 2: Building the Hull

The hull is the heart of your houseboat, providing the essential structure and buoyancy. This is a crucial step that requires precision and attention to detail.

2.1 Selecting the Right Wood

Durable and water-resistant wood is essential for a long-lasting hull. Marine plywood, cedar, and mahogany are excellent choices. Consider the cost, availability, and the specific properties of each type of wood.

2.2 Framing and Planking

The hull's framing provides the skeletal support, and the planking forms its outer shell. Use marine-grade plywood or planks of wood to construct the framing. The planking can be done using lap joints, butt joints, or scarf joints for a strong and watertight seal.

2.3 Waterproofing and Insulation

Applying a sealant to the hull's interior and exterior is critical to prevent leaks and water damage. Epoxy resin is an excellent choice for its strength and water resistance. Insulation will help maintain a comfortable temperature inside the houseboat, especially in colder climates.

Step 3: Designing and Constructing the Superstructure

The superstructure is the above-water portion of your houseboat, containing living spaces, decks, and other features. This step involves carefully considering the design and using high-quality materials for a comfortable and functional living area.

3.1 Framing and Walls

Use structural timber for framing the superstructure. Consider using pre-engineered framing panels for efficiency. The walls can be built using plywood, drywall, or a combination of both. Ensure that all walls and partitions are properly secured to the framing.

3.2 Roofing and Deck Construction

Choose a strong and weatherproof roofing material, such as metal roofing or fiberglass shingles. Build the deck using treated lumber and ensure a secure and comfortable surface. Consider adding handrails and other safety features to the deck.

3.3 Windows and Doors

Choose windows and doors that are designed for marine environments and resistant to moisture. Double-pane windows offer superior insulation. Make sure doors and windows are properly sealed for both water and weather tightness.

Step 4: Finishing Touches and Systems

Now it's time to add the finishing touches that will transform your houseboat from a construction project to a floating home.

4.1 Interior Design and Decoration

Personalize your houseboat with the interior design of your dreams. Choose flooring, furniture, and décor that reflects your style and creates a welcoming atmosphere. Consider using materials that are easy to clean and maintain, like vinyl flooring or washable paint.

4.2 Electrical and Plumbing Systems

Installing electrical and plumbing systems is crucial for a functional houseboat. Hire a qualified electrician and plumber to ensure that the systems are installed safely and meet all regulations. Consider using marine-grade appliances and fixtures for added durability.

4.3 Navigation and Safety Equipment

Equip your houseboat with essential navigation and safety equipment. This includes a compass, GPS, flares, life jackets, and fire extinguishers. Consult local regulations for specific requirements.

Step 5: Launching and Testing

After completing construction, it's time to launch your houseboat. This is a momentous occasion that marks the realization of your hard work.

5.1 Final Inspections and Preparations

Before launching, ensure all systems are operational and that you have all necessary safety equipment. Inspect the hull for any leaks or imperfections. Make sure you have a suitable launch site and a team to assist with the launch process.

5.2 Launching and Initial Testing

Carefully launch your houseboat into the water. Perform initial tests to check for leaks and ensure that the vessel handles and navigates as expected. Adjust and fine-tune any issues as needed.

5.3 Registration and Documentation

Register your houseboat with the appropriate authorities. Ensure you have the necessary documentation, including a certificate of registration and a valid boating license.

Enjoy Your Floating Home

Building a wooden houseboat is a challenging but rewarding endeavor. With careful planning, meticulous construction, and a touch of creativity, you can build a unique and personal floating oasis that will bring you joy and adventure for years to come. Enjoy the tranquility of life on the water, knowing that you have created a truly exceptional home on the waves.

Free Wooden Sailboat Plans with Step-by-Step Instructions

Free Wooden Sailboat Plans with Step-by-Step Instructions

Free Wooden Sailboat Plans with Step-by-Step Instructions: Your Journey to Sailing Begins Here

Have you ever dreamt of gliding across the water, the wind filling your sails, and the sun warming your face? Maybe you've always been fascinated by the elegance of wooden boats, the way they seem to dance with the waves. Well, I'm here to tell you that your dream of building your own wooden sailboat is closer than you think!

In this guide, we'll embark on a journey together, step by step, to create your very own sailboat from scratch. No need for fancy tools or expensive materials, just a passion for woodworking and a willingness to learn. We'll explore the world of free sailboat plans, discover the best resources for learning, and equip you with the knowledge and confidence to build your dream boat.

Choosing the Right Sailboat Plan for You

The first step is to find a plan that suits your skill level and desired size. There are a ton of free sailboat plans available online, ranging from simple dinghies to more complex cruising boats. Here are some popular websites to explore:

  • Boat Plans Free: This website boasts a massive collection of free boat plans, including sailboats, dinghies, and kayaks, all organized by type and size.
  • Free Boat Plans: As the name suggests, this website offers a wide array of free plans, including various sailboat designs, all categorized for easy browsing.
  • The Wooden Boat Shop: While not all plans are free, this website offers a generous selection of free plans, including smaller sailboats ideal for beginners.
  • Duckworks: A haven for boat builders, Duckworks features a variety of free boat plans, with detailed instructions and helpful tips.
  • The Maritime Museum of San Diego: This museum offers free historical boat plans, including some stunning sailing vessels, perfect for a unique and challenging build.

Factors to Consider When Choosing a Plan

Once you've got a few plans in mind, it's time to narrow down your choices. Consider these important factors:

  • Skill level: Choose a plan that matches your woodworking experience. If you're a beginner, start with a simpler design.
  • Boat size: Think about how you'll be using your sailboat. A smaller dinghy is perfect for exploring lakes and bays, while a larger cruiser can handle longer voyages.
  • Sailing style: Do you prefer a fast and sporty boat, or a leisurely cruiser? The plan you choose will influence your boat's performance and handling characteristics.
  • Materials: Some plans specify certain types of wood, while others offer flexibility. Make sure the materials are readily available in your area.

Gathering the Necessary Tools and Materials

Now that you've chosen your plan, let's talk about tools and materials. Here's a basic list of what you'll need:

  • Wood: The plan will specify the types and quantities of wood required. Choose high-quality lumber, preferably marine-grade wood for better durability.
  • Hand tools: You'll need basic woodworking tools like a hand saw, hammer, chisels, planes, and measuring tools.
  • Power tools: A drill, sander, jigsaw, and maybe even a table saw will come in handy for more intricate work.
  • Fasteners: You'll need screws, nails, and possibly epoxy for joining the wood components.
  • Finishing supplies: This includes sanding paper, paint, varnish, and any other protective coatings you choose.
  • Hardware: The plan will likely include a list of hardware like cleats, blocks, and rigging components.

Tips for Buying Materials

  • Shop around: Compare prices at different lumberyards and hardware stores to find the best deals.
  • Check for quality: Make sure the wood is free of knots, cracks, and other defects. Look for straight grain and a uniform texture.
  • Consider marine-grade wood: For better durability and water resistance, consider using marine-grade plywood or treated lumber.
  • Buy in bulk: If you're building a larger boat, buying wood in bulk can save you money.

Building Your Wooden Sailboat: Step-by-Step Instructions

Now comes the fun part: building your boat! Remember, this is a general guide, and each plan will have its unique steps. But these fundamentals will apply to most wooden sailboat builds:

1. Laying Out the Plan

  • Carefully study the plan and understand its different sections.
  • Transfer the dimensions onto your chosen wood, using a pencil and ruler.
  • For more complex shapes, consider using a template or pattern.

2. Cutting and Shaping the Wood

  • Start by cutting the wood to the specified dimensions, using a hand saw or a jigsaw.
  • For intricate shapes, use a band saw or a router.
  • Sand the edges of the cut pieces to create a smooth surface.

3. Assembling the Hull

  • The plan will guide you on how to assemble the hull panels and ribs, using screws, nails, or epoxy.
  • Make sure all joints are tight and well-aligned.
  • Use clamps to hold the pieces together while the glue dries or the fasteners are driven in.

4. Building the Deck and Superstructure

  • Once the hull is complete, you'll construct the deck and any other superstructure, such as a cabin or cockpit.
  • Use the plan as your blueprint for laying out the deck beams and supports.
  • Attach the deck to the hull using screws, nails, or epoxy, ensuring a watertight seal.

5. Installing the Mast and Rigging

  • The plan will specify the mast's dimensions, material, and installation method.
  • Once the mast is securely mounted, install the rigging, which includes the sails, ropes, and blocks.
  • Use the plan as your guide for rigging the boat correctly for optimal performance and safety.

6. Finishing the Boat

  • After the boat is assembled, it's time for the finishing touches.
  • Sand the entire boat thoroughly to create a smooth surface for paint or varnish.
  • Choose a suitable paint or varnish for marine use to protect your boat from the elements.

Tips for a Successful Boat Build

  • Take your time: Boat building is a process, not a race. Be patient, meticulous, and don't rush through any steps.
  • Double-check your measurements: Accuracy is essential in boat building. Always double-check your measurements before cutting or joining wood.
  • Use the right tools: Invest in good quality tools that will help you do the job correctly.
  • Ask for help when needed: Don't be afraid to reach out to experienced boat builders for advice or help with tricky parts.
  • Document your progress: Take photos and keep detailed notes as you go. This will be helpful for troubleshooting and remembering your process.

Commonly Asked Questions

1. What if I'm not a skilled woodworker?

Don't let that stop you! There are many beginner-friendly plans available, and you can learn as you go. Start with a smaller boat and gradually work your way up to more complex designs.

2. How much does it cost to build a wooden sailboat?

The cost can vary depending on the size and complexity of the boat, the quality of materials, and your own labor. However, building a wooden sailboat is often more affordable than buying a similar boat new.

3. What if I need help with a particular step?

Many online communities and forums are dedicated to boat building. You can ask questions, share photos, and get advice from experienced builders.

4. Is it safe to sail a boat I built myself?

Yes, it is safe if you follow the plans carefully and build the boat to the highest standards. However, always practice good seamanship and safety procedures when sailing.

Now, with all this knowledge in hand, you're ready to embark on your own boat-building adventure! Remember, the journey is as rewarding as the destination. So grab your tools, choose your plan, and let's get building!

How to Build a Wooden Yacht: Complete Guide with Tips

How to Build a Wooden Yacht: Complete Guide with Tips

Building a Wooden Yacht: A Complete Guide with Tips

Embarking on the journey of building a wooden yacht is a testament to your passion for craftsmanship and the allure of the sea. This project demands dedication, meticulous attention to detail, and a deep appreciation for the artistry of woodworking. Whether you're a seasoned boat builder or a novice eager to dive into this captivating endeavor, this comprehensive guide will equip you with the knowledge and tips you need to transform your dreams into a breathtaking wooden masterpiece.

1. Planning Your Wooden Yacht

Before you pick up a single tool, a well-defined plan is your compass. It sets the course for a successful build and ensures you're crafting a yacht that aligns with your vision.

1.1 Choosing the Right Design

The design is the foundation of your yacht. Explore established plans, consult with naval architects, or even create your own. Consider factors like:

  • Size: Determine the length, beam, and draft that suits your needs and budget.
  • Hull Shape: Choose between traditional designs like a gaff rig or modern designs with sleek lines.
  • Rigging: Opt for sail types like sloops, ketches, or yawls based on your sailing experience and the yacht's intended use.
  • Accommodation: Plan the layout of cabins, galley, and heads to meet your comfort requirements.

1.2 Gathering Materials

Select high-quality wood that is strong, durable, and resistant to rot and water damage. Common choices include:

  • Oak: Strong and weather-resistant, ideal for frames and keels.
  • Mahogany: Elegant and stable, often used for planking and interior finishes.
  • Cedar: Aromatic and naturally resistant to decay, suitable for deck and interior components.

You'll also need:

  • Fasteners: Copper or bronze screws and bolts for longevity in marine environments.
  • Epoxy and Resins: To seal joints, reinforce structures, and provide waterproof protection.
  • Finishing Materials: Paints, varnishes, and marine-grade adhesives for protection and aesthetic appeal.

2. Building the Hull

The hull is the heart of your yacht, providing structural integrity and hydrodynamic efficiency. This stage requires meticulous craftsmanship and adherence to the design plans.

2.1 Framing the Hull

The frame, or skeleton, of the hull is constructed from strong timbers. Carefully cut and join these timbers to form ribs, stringers, and the keel, ensuring precise angles and alignment. Use epoxy or marine glue to create strong, waterproof bonds.

2.2 Planking the Hull

Planking involves covering the frame with planks of wood, shaping them to the hull's contours. This step demands patience and skill, as the planks must be precisely fitted and fastened to the frame. Use steaming or bending techniques to achieve the desired curves.

2.3 Fairing the Hull

Once planking is complete, the hull needs fairing to smooth out any irregularities and create a hydrodynamic surface. Use specialized tools and sanding techniques to achieve a smooth, even finish.

3. Constructing the Deck and Superstructure

The deck and superstructure provide the yacht's walking surfaces, living space, and essential features. This phase requires careful planning and execution to create a functional and aesthetically pleasing design.

3.1 Building the Deck

The deck is constructed using similar techniques as the hull: framing, planking, and fairing. Consider the placement of hatches, ports, and other openings for access and ventilation. Use strong, durable wood for the deck planking, such as teak or cedar.

3.2 Adding the Superstructure

The superstructure includes features like the cabin, cockpit, and companionway. Frame these structures, plank them with wood, and install windows and doors. Pay attention to the flow and functionality of living spaces.

4. Installing Systems and Equipment

Once the basic structure is complete, focus on installing essential systems and equipment that make your yacht operational and comfortable.

4.1 Electrical Systems

Install wiring for lighting, navigation instruments, and other electrical components. Use marine-grade wiring and circuit breakers to ensure safety and reliability.

4.2 Plumbing Systems

Install water tanks, plumbing pipes, and fixtures for freshwater and sanitation systems. Use marine-grade materials and fittings that resist corrosion and leaks.

4.3 Engine Installation

If your yacht is powered by an engine, carefully mount and align the engine, connect fuel lines, and install cooling and exhaust systems. Follow manufacturer instructions and safety guidelines meticulously.

5. Finishing and Launching

The final stages involve sanding, painting, varnishing, and launching your wooden yacht. This is where your dedication and craftsmanship truly shine. Pay close attention to detail and use high-quality marine finishes to protect and enhance the beauty of your masterpiece.

5.1 Sanding and Finishing

Sand the entire yacht using progressively finer grit sandpaper to achieve a smooth, even surface. This prepares the wood for paint or varnish. Use marine-grade paint and varnish that resist UV rays, water damage, and fungal growth.

5.2 Launching and Sea Trials

Once the finishing touches are complete, carefully launch your yacht into the water. Conduct sea trials to test its performance, stability, and handling. Make any necessary adjustments to fine-tune the yacht's behavior.

6. Maintaining Your Wooden Yacht

Building a wooden yacht is a journey that doesn't end with launching. Proper maintenance is essential to preserve its beauty and functionality for years to come.

6.1 Regular Cleaning and Inspection

Clean your yacht regularly to remove dirt, salt, and debris. Inspect for any signs of wear and tear, such as cracks, leaks, or loose fasteners. Address these issues promptly to prevent further damage.

6.2 Applying Protective Coatings

Reapply paint or varnish as needed to maintain a protective barrier against the elements. This will help preserve the wood and keep your yacht looking its best.

Building a wooden yacht is a challenging but deeply rewarding journey. It's a testament to the enduring artistry of woodworking and a way to connect with the sea in a profoundly personal way. Embrace the process, learn from each step, and take pride in creating a masterpiece that will endure for generations to come.

Free Wooden Kayak Plans for Quick and Efficient Builds

Free Wooden Kayak Plans for Quick and Efficient Builds

Free Wooden Kayak Plans for Quick and Efficient Builds

Embark on a rewarding journey of building your own wooden kayak. With readily available resources and detailed plans, you can craft a beautiful and functional watercraft right from your workshop. This article will guide you through a comprehensive selection of free wooden kayak plans designed for quick and efficient builds, allowing you to enjoy the thrill of paddling your creation on the water in no time.

Benefits of Building a Wooden Kayak

Constructing a wooden kayak offers numerous advantages that extend beyond the satisfaction of crafting something with your own hands. Here are some key benefits:

  • Exceptional Durability and Strength: Wood, particularly when properly treated, possesses remarkable strength and longevity, ensuring your kayak can withstand the rigors of water adventures.
  • Elegant Aesthetics: The natural beauty of wood lends itself to creating sleek and elegant kayaks, showcasing intricate details and a unique character.
  • Personalized Design: Building your own kayak allows for complete customization, enabling you to tailor its features and design to your specific preferences and needs.
  • Cost-Effectiveness: While the initial investment in materials may seem significant, building your own kayak can often be more cost-effective than purchasing a ready-made one.

Selecting the Right Wooden Kayak Plan

The first step in building your wooden kayak is choosing the right plan. Several free resources provide detailed instructions and blueprints. Consider the following factors when making your selection:

  • Skill Level: Choose a plan that aligns with your woodworking experience. Beginner-friendly plans often feature simpler designs with fewer intricate details.
  • Kayak Type: Determine the type of kayaking you intend to do. Recreational plans are ideal for leisurely paddling, while touring plans cater to longer expeditions.
  • Dimensions and Capacity: Select a plan that suits your size and the weight you intend to carry.
  • Material Recommendations: Pay attention to the recommended wood species and thicknesses specified in the plans.

Essential Tools and Materials

Before diving into the building process, ensure you have the necessary tools and materials at your disposal:

Tools

  • Hand Tools: Hammers, saws, chisels, planes, screwdrivers, measuring tapes, and marking tools
  • Power Tools: Table saw, band saw, drill, jigsaw, sander, and router (optional)
  • Clamps: A variety of clamps, including bar clamps, spring clamps, and C-clamps
  • Safety Gear: Safety glasses, ear protection, dust mask, and gloves

Materials

  • Wood: Cedar, mahogany, or spruce are popular choices for kayak construction.
  • Epoxy Resin and Hardener: For bonding and waterproofing the wood.
  • Fiberglass Cloth: To reinforce the kayak hull and add strength.
  • Wood Filler: For filling gaps and imperfections in the wood.
  • Paint or Varnish: To protect the wood from the elements.
  • Hardware: Deck fittings, hatches, and other necessary components.

Building Your Wooden Kayak: A Step-by-Step Guide

Now, let's break down the construction process into manageable steps:

1. Preparation and Cutting

  • Study the Plans: Carefully review the plans, understanding the dimensions, angles, and components.
  • Material Selection: Choose high-quality wood that is free from knots and imperfections.
  • Cutting: Accurately cut the wood pieces according to the plans.

2. Assembly and Bonding

  • Dry Fit: Assemble the kayak hull without glue to ensure a proper fit and check for any adjustments.
  • Epoxy Bonding: Carefully apply epoxy resin and hardener according to the manufacturer's instructions.
  • Clamping: Securely clamp the assembled sections together until the epoxy fully cures.

3. Fiberglass Reinforcement

  • Prepare the Surface: Sand the surface of the kayak hull to create a smooth and even finish.
  • Apply Epoxy and Fiberglass: Lay fiberglass cloth over the hull, saturating it with epoxy resin.
  • Curing: Allow the fiberglass and epoxy to fully cure before proceeding.

4. Finishing Touches

  • Sanding and Fairing: Carefully sand the hull to remove any imperfections or excess fiberglass.
  • Wood Filler: Fill any remaining gaps or voids with wood filler.
  • Painting or Varnishing: Apply your chosen paint or varnish to protect the wood and enhance its beauty.
  • Installing Hardware: Install deck fittings, hatches, and other essential components.

Tips for Efficient Building

To streamline your kayak construction process, consider the following tips:

  • Work in a Well-Ventilated Area: Epoxy fumes can be harmful, so ensure proper ventilation during the building process.
  • Organize Your Workspace: Keep your tools and materials organized for easy access and a smooth workflow.
  • Take Breaks: Avoid fatigue by taking frequent breaks to maintain accuracy and precision.
  • Measure Twice, Cut Once: Always double-check your measurements before making any cuts to ensure a precise fit.
  • Seek Guidance: If you encounter any difficulties or have questions, consult online forums, woodworking communities, or experienced kayak builders for assistance.

Conclusion

Building a wooden kayak is a rewarding and fulfilling experience that combines craftsmanship and adventure. With readily available free plans and this comprehensive guide, you can craft a unique and beautiful kayak to enjoy for years to come. Remember to take your time, follow the instructions carefully, and embrace the learning process. As you navigate the waters in your handmade masterpiece, you'll have a deep sense of accomplishment and pride in your creation.

Wooden Sailboat Plans for Luxury Designs and Performance

Wooden Sailboat Plans for Luxury Designs and Performance

Wooden Sailboat Plans for Luxury Designs and Performance

For those seeking a unique and timeless maritime experience, a wooden sailboat offers unparalleled beauty, craftsmanship, and performance. Building a wooden sailboat from plans is a rewarding journey that allows you to create a truly bespoke vessel, tailored to your specific preferences. This article explores the world of wooden sailboat plans, focusing on designs that combine luxury, performance, and enduring elegance.

The Allure of Wooden Sailboats

Wooden sailboats possess a timeless charm that transcends fleeting trends. The natural warmth and beauty of wood evoke a sense of history and craftsmanship, creating a truly captivating ambiance onboard. The sound of the wind through the rigging and the gentle creak of the hull as it cuts through the water add to the sensory experience, fostering a profound connection with the sea.

Exceptional Craftsmanship

Building a wooden sailboat is an intricate process that requires the skills of experienced boatbuilders. The precision and artistry involved in shaping, joining, and finishing the wood result in a vessel that is not only functional but also a testament to human ingenuity and skill. Each plank, each curve, and each detail tells a story of dedication and passion.

Performance Advantages

Contrary to common misconceptions, wooden sailboats can be incredibly fast and responsive. The inherent strength and flexibility of wood allow for designs that are both lightweight and strong, providing an ideal balance of agility and stability. Well-designed wooden hulls offer excellent resistance to wave impacts, ensuring a comfortable and smooth ride even in choppy seas.

Choosing the Right Wooden Sailboat Plan

Selecting the right wooden sailboat plan is the cornerstone of your project. It's essential to consider your experience level, available resources, and desired sailing characteristics. The following factors are crucial in making an informed decision:

Design Style

Wooden sailboat plans encompass a wide range of designs, from classic schooners and yawls to modern performance cruisers. Consider the following styles:

  • Classic Designs: Traditional designs like schooners, yawls, and ketches emphasize elegance and seaworthiness. They often feature long, slender hulls with intricate rigging, offering a classic sailing experience.
  • Modern Designs: These designs prioritize speed and performance, often incorporating modern hull shapes and sail plans for efficient sailing. They may feature sleek lines and minimalist rigging.
  • Hybrid Designs: Many plans offer a blend of classic and modern features, combining the beauty of traditional elements with the performance of modern design principles.

Size and Displacement

The size and displacement of your sailboat will determine its sailing characteristics and accommodation capacity. Consider the following aspects:

  • Length: The overall length of the boat affects its speed and seaworthiness. Longer boats generally offer more space and stability but require more effort to maneuver.
  • Beam: The width of the boat influences its stability and interior space. A wider beam provides more stability but may reduce speed in lighter winds.
  • Displacement: The weight of the boat when fully loaded impacts its performance and sailing characteristics. Lighter boats tend to be faster but less stable in rough seas.

Construction Techniques

Wooden sailboat plans may utilize different construction techniques, each with its own advantages and challenges. Common methods include:

  • Planking: This traditional technique involves attaching planks of wood to the boat's frame. It offers flexibility and allows for a variety of hull shapes.
  • Strip Planking: This method uses thin strips of wood that are glued and clamped together to form the hull. It offers a lighter construction and often results in a smoother finish.
  • Plywood Construction: Using marine-grade plywood panels, this method is faster and requires less skilled labor. It offers a robust and durable construction, but may not be as aesthetically pleasing as traditional planking.

Finding Wooden Sailboat Plans

There are numerous sources for finding wooden sailboat plans. Here are some options:

  • Online Retailers: Many online retailers specialize in sailboat plans, offering a wide range of designs and construction techniques.
  • Boatbuilding Magazines: Publications like WoodenBoat and Sail magazine often feature plans and articles on wooden boat construction.
  • Boatbuilding Associations: Associations like the American Boat and Yacht Council (ABYC) offer resources and guidance for boatbuilders.
  • Private Designers: Many experienced naval architects and boat designers offer custom plans tailored to specific requirements.

Building Your Wooden Sailboat

Building a wooden sailboat is a rewarding but challenging project. It's essential to have the necessary skills and resources before embarking on the journey. Here are some key steps:

Materials and Tools

Gather all the necessary materials, including wood, fasteners, epoxy, paint, and finishing materials. Invest in high-quality tools, such as saws, planes, chisels, and clamps. It's also essential to have access to a well-equipped workshop or boatbuilding facility.

Following the Plans

Adhere strictly to the plans, paying close attention to the dimensions, angles, and construction techniques. Seek clarification from the designer if any aspects are unclear.

Step-by-Step Construction

Construct the boat in stages, following the detailed instructions provided in the plans. Start with the frame, then move on to planking, decks, and interior fittings. Be meticulous in each step, ensuring precise measurements and accurate assembly.

Finishing and Rigging

Once the hull is complete, focus on finishing details. Sand, prime, and paint the boat according to your preference. Install all the fittings and rigging according to the plans.

Conclusion

Building a wooden sailboat from plans is a journey of passion, craftsmanship, and dedication. The result is a timeless vessel that combines luxury, performance, and enduring beauty. Whether you choose a classic or modern design, building a wooden sailboat offers an unparalleled maritime experience, connecting you with the history and artistry of boatbuilding.

Wooden Kayak Plans for Both DIY and Professional Builders

Wooden Kayak Plans for Both DIY and Professional Builders

Wooden Kayak Plans: Navigate Your Way to Building the Perfect Watercraft

Embrace the timeless art of woodworking and craft a unique kayak that reflects your personality. This guide delves into the world of wooden kayak plans, offering valuable insights for both DIY enthusiasts and seasoned builders. Whether you're a novice yearning to conquer your first woodworking project or a professional seeking exceptional plans to elevate your craftsmanship, this comprehensive guide will equip you with the knowledge and resources needed to build a beautiful and functional kayak.

Why Choose Wooden Kayak Plans?

Wooden kayaks offer an unparalleled blend of elegance, durability, and performance. Unlike their plastic counterparts, they possess a warmth and character that transcends mere functionality. Here's why you should consider building your own wooden kayak:

Unmatched Aesthetics and Craftsmanship:

The inherent beauty of wood is undeniable. A wooden kayak is a testament to the builder's skill and artistry, showcasing the natural grain patterns and intricate details that define each unique piece.

Superior Durability and Longevity:

Properly constructed, a wooden kayak can withstand the rigors of time and the elements. With proper care, it will last for generations, becoming a cherished heirloom.

Exceptional Performance and Responsiveness:

Wooden kayaks are known for their smooth glide and responsiveness, making them a joy to paddle. They can effortlessly navigate through calm waters and handle choppy conditions with ease.

Choosing the Right Wooden Kayak Plans:

Selecting the right plans is the foundation of your kayak building journey. Consider these factors:

Skill Level:

Choose plans that align with your woodworking experience. Beginners may opt for simpler designs, while experienced builders can tackle more complex models.

Intended Use:

Determine the type of kayaking you'll be doing. Plans cater to different styles, from leisurely cruising to whitewater adventures.

Kayak Size and Dimensions:

Consider your height, weight, and paddling preferences. The plans will specify the kayak's length, width, and depth.

Material and Construction Techniques:

Plans often specify the type of wood and construction methods. Familiarize yourself with these to ensure compatibility with your tools and skills.

DIY Wooden Kayak Plans:

For DIY enthusiasts, numerous resources offer exceptional wooden kayak plans. Here are some popular sources:

Online Resources:

  • Boatbuilding Forums: Connect with fellow kayak builders and access a wealth of plans, tips, and advice.
  • Online Retailers: Many websites specialize in downloadable wooden kayak plans, offering a variety of designs.
  • Free Plans: You can find free plans online, but be mindful of their quality and completeness.

Books and Publications:

Browse books and magazines dedicated to boatbuilding. They often feature detailed plans and step-by-step instructions.

Professional Wooden Kayak Plans:

For professional builders seeking high-quality, well-designed plans, several reputable sources cater to their needs.

Established Boatbuilding Companies:

Renowned boatbuilding companies offer plans for their proven kayak models, often including comprehensive construction guides and technical support.

Independent Designers and Architects:

Many talented designers specialize in wooden kayak plans, creating innovative and aesthetically pleasing designs.

Building Your Wooden Kayak:

Once you have your plans, meticulously follow the instructions. Utilize high-quality materials, precision tools, and proper construction techniques. Take your time, enjoy the process, and don't hesitate to seek guidance from experienced builders.

Finishing Your Wooden Kayak:

After assembly, finish your kayak with care. Apply a protective sealant to prevent water damage and enhance its beauty. Add a splash of color with custom paint or varnish.

Enjoy Your Handmade Masterpiece:

The moment you launch your handcrafted wooden kayak onto the water is a testament to your dedication and skill. Enjoy the feeling of gliding through the water in a vessel that you built with your own hands.

Wooden Rowboat Plans for Traditional and Classic Designs

Wooden Rowboat Plans for Traditional and Classic Designs

Wooden Rowboat Plans for Traditional and Classic Designs

For centuries, wooden rowboats have been the vessels of choice for navigating rivers, lakes, and coastal waters. Their timeless elegance and inherent strength make them both practical and aesthetically pleasing. Today, many boat enthusiasts are drawn to the allure of building their own wooden rowboats, and with the right plans, it can be an achievable and rewarding project. This article explores the world of wooden rowboat plans, delving into traditional and classic designs that offer both practicality and beauty.

Types of Wooden Rowboat Plans

Wooden rowboat plans encompass a diverse range of designs, each with its own unique characteristics and intended use. Here are some of the most common types of wooden rowboat plans:

Traditional Rowboats

Traditional rowboats, often referred to as "dories" or "skiffs," are characterized by their simple construction and robust build. They are typically designed for fishing, hauling, or general rowing. Some of the common features of traditional rowboats include:

  • Planked hull: Traditional rowboats usually have a planked hull, where planks of wood are laid over frames to form the boat's shape.
  • Shallow draft: Their shallow draft allows them to navigate shallow waters and beaches with ease.
  • Simple rigging: Traditional rowboats usually have simple rigging, with a single pair of oars and rowlocks.
  • Durability: Their solid construction makes them durable and capable of handling rough conditions.

Classic Rowboats

Classic rowboats, often known as "racing shells" or "gigs," are designed for speed and efficiency. These boats often feature a streamlined hull, lightweight construction, and optimized rigging for optimal rowing performance. Key characteristics of classic rowboats include:

  • Lightweight construction: Classic rowboats are built using lightweight woods like cedar or spruce to minimize weight.
  • Streamlined hull: They have a sleek, streamlined hull that reduces water resistance.
  • Optimized rigging: Classic rowboats often use specialized oars and rowlocks for enhanced rowing efficiency.
  • Performance focus: Their design prioritizes speed and maneuverability over carrying capacity.

Modern Rowboats

Modern rowboats incorporate design elements from traditional and classic boats, often blending practicality with aesthetics. They may feature contemporary construction techniques, such as epoxy resins, and innovative designs that enhance performance and comfort. Some common features of modern rowboats include:

  • Epoxy construction: Many modern rowboats utilize epoxy resins for bonding and waterproofing, providing superior strength and durability.
  • Composite materials: Some modern rowboats incorporate composite materials, such as fiberglass or carbon fiber, to enhance strength and reduce weight.
  • Ergonomic design: They often feature ergonomic seating and rowing positions for enhanced comfort and performance.
  • Versatility: Modern rowboats can be designed for a variety of uses, from recreational rowing to competitive racing.

Finding Wooden Rowboat Plans

Numerous resources offer wooden rowboat plans, both traditional and modern. Here are some options for finding plans:

Online Resources

The internet provides a wealth of information on wooden rowboat plans. Websites such as:

  • Boat plans websites: Specialized websites dedicated to boat plans, such as Glen-L Marine Designs, Duckworks Boat Plans, and Bateau.com, offer a wide selection of rowboat plans.
  • Online forums: Boat building forums, such as The Wooden Boat Forum and Boat Design Net, often have members who share plans or offer guidance.
  • Online marketplaces: Online marketplaces like Etsy and eBay may offer plans for sale.

Bookstores and Libraries

Many bookstores and libraries carry books on boat building and wooden boat plans. These books can provide detailed information, drawings, and instructions for constructing a variety of rowboats.

Boatbuilding Classes and Workshops

Boatbuilding classes and workshops offer hands-on experience and guidance in boat construction. These classes often include access to plans and expert instruction.

Choosing the Right Wooden Rowboat Plan

Selecting the right wooden rowboat plan requires careful consideration. Here are some factors to keep in mind:

  • Intended use: Determine how you plan to use the boat. Are you primarily interested in rowing on a lake, fishing, or racing?
  • Size and capacity: Consider the number of people and the amount of gear you plan to carry.
  • Skill level: Evaluate your boatbuilding experience. Some plans are more complex than others.
  • Budget: Factor in the cost of materials, tools, and any necessary assistance.
  • Aesthetic preferences: Choose a design that aligns with your aesthetic preferences.

Building Your Wooden Rowboat

Building a wooden rowboat is a challenging yet rewarding project. Here are some key steps involved in the process:

  • Materials selection: Choose high-quality wood suitable for boat construction, such as cedar, spruce, or oak.
  • Cutting and shaping: Cut and shape the wood according to the plan's specifications.
  • Framing and planking: Assemble the frame and plank the hull.
  • Deck and interior construction: Build the deck and interior features.
  • Finishing: Sand, paint, and varnish the boat for a durable and aesthetically pleasing finish.
  • Rigging: Install oars, rowlocks, and any other necessary rigging.

Conclusion

Building a wooden rowboat from plans is a journey that combines craftsmanship, creativity, and a deep appreciation for maritime tradition. By carefully selecting the right plan, gathering the necessary materials and tools, and dedicating time and effort, you can bring to life a timeless masterpiece that will provide years of enjoyment on the water. Whether you choose a traditional or modern design, the process of building a wooden rowboat is a rewarding experience that connects you to the history of boat building and the beauty of handcrafted vessels.

How to Build a Plywood Boat on a Budget

How to Build a Plywood Boat on a Budget

Building a Plywood Boat on a Budget: A Step-by-Step Guide

Dreaming of cruising the open water but don't want to break the bank? Building a plywood boat can be a rewarding and affordable way to realize your nautical aspirations. With a little time, effort, and the right materials, you can construct a seaworthy vessel that will provide years of enjoyment. This guide will walk you through the essential steps, ensuring you embark on your boatbuilding journey with confidence.

Step 1: Choosing Your Plywood Boat Design

The first step is selecting a design that aligns with your skills, budget, and intended use. Explore online resources, boatbuilding books, and forums for inspiration. Consider the following:

Boat Type:

  • Rowboats: Classic and simple, ideal for leisurely paddling.
  • Dinghies: Small, versatile boats for sailing or rowing.
  • Kayaks: Sleek and efficient for solo paddling.
  • Canoes: Roomy and stable for tandem paddling.

Size and Capacity:

Determine the desired length, width, and weight capacity based on your intended use and the number of people you'll be carrying.

Construction Complexity:

Choose a design within your skill level. Start with simpler plans if you're a beginner and gradually tackle more intricate builds as you gain experience.

Step 2: Gathering Materials and Tools

Once you've chosen your design, gather the necessary materials and tools. Here's a basic list:

  • Marine-grade plywood: Opt for high-quality plywood specifically designed for boat construction. This is crucial for durability and water resistance.
  • Epoxy resin and hardener: Use epoxy for bonding plywood sheets and sealing the boat against water penetration.
  • Boatbuilding plans: Obtain detailed plans from a reputable source or design your own using software like AutoCAD or SketchUp.
  • Tools: Invest in basic woodworking tools like a circular saw, jigsaw, drill, clamps, and sandpaper.
  • Hardware: Gather fasteners like screws, bolts, nuts, and washers, as well as any required fittings (oars, seats, etc.).

Step 3: Cutting and Assembling the Boat

Carefully follow the instructions in your boatbuilding plans for cutting the plywood sheets. Use a circular saw for straight cuts and a jigsaw for curved sections. Ensure precise measurements to maintain the boat's integrity. Once you've cut all the parts, you can start assembling the hull.

  • Use epoxy to bond the plywood sheets together. Apply a generous amount of epoxy to all mating surfaces and clamp the parts securely until the epoxy cures. Follow the manufacturer's instructions for curing time.
  • Add support structures, like ribs and stringers, to provide strength and rigidity.
  • Install any required bulkheads or other structural elements.

Step 4: Finishing and Waterproofing

After the boat is fully assembled, it's time to finish and waterproof it.

  • Sand all surfaces smooth using sandpaper of progressively finer grits.
  • Apply a layer of epoxy to all exterior surfaces, paying special attention to joints and seams. This creates a watertight barrier.
  • Apply a final coat of paint or varnish to protect the wood and enhance the boat's aesthetics. Choose a marine-grade paint or varnish specifically designed for boat use.

Step 5: Launching and Enjoying Your Boat

Congratulations! Your plywood boat is ready to launch.

  • Test your boat in calm waters and gradually increase the waves as you gain confidence.
  • Always wear a life jacket when boating, and practice safe boating habits.
  • Most importantly, enjoy your creation and the joy of gliding across the water in a boat you built yourself!

DIY Duck Boat: How to Choose Between Wood, Aluminum, and Fiberglass

DIY Duck Boat: How to Choose Between Wood, Aluminum, and Fiberglass

Building Your Own Duck Boat: Choosing the Right Material

So you’re thinking about building your own duck boat. That’s awesome! It’s a great way to save money, get your hands dirty, and build something truly personal. But before you start hammering away, you have a big decision to make: what material should you use? Wood, aluminum, or fiberglass? Each has its own advantages and drawbacks, so it’s worth spending some time considering your options.

Let's break down the pros and cons of each material so you can pick the best fit for your needs and skill level.

Wood: The Classic Choice

Wood has long been a popular material for duck boats. It’s naturally buoyant, relatively inexpensive, and easy to work with. If you’re handy with tools and enjoy the craft of woodworking, a wooden duck boat could be a rewarding project.

Pros of Wood:

  • Affordability: Wood is generally less expensive than aluminum or fiberglass, especially if you’re sourcing your own lumber.
  • Easy to Work With: You don’t need specialized tools to work with wood. Basic hand tools will get you a long way.
  • Warmth and Comfort: Wood is a natural material that can feel warmer and more comfortable to sit on than metal or fiberglass, especially on chilly mornings.
  • Customization: Wood is easily customizable. You can shape it, carve it, and even add decorative elements to create a truly unique boat.

Cons of Wood:

  • Maintenance: Wood requires regular maintenance, including sanding, staining, and sealing, to prevent rot and damage.
  • Durability: Wood is not as durable as aluminum or fiberglass. It's susceptible to dents, scratches, and water damage.
  • Weight: Wood is heavier than aluminum, which can affect your boat's performance and handling.

Aluminum: Tough and Durable

Aluminum is a strong, lightweight, and corrosion-resistant material. It's a popular choice for duck boats because it holds up well to the rigors of hunting and can be easily repaired in the field.

Pros of Aluminum:

  • Durability: Aluminum is incredibly strong and resistant to dents, scratches, and rust. It can handle harsh conditions and impacts without easily denting or breaking.
  • Lightweight: Aluminum is lighter than wood, which can improve your boat's performance and handling. You’ll be able to maneuver quickly and easily through the water.
  • Low Maintenance: Aluminum doesn't require much maintenance. Just wash it down after use and it’s good to go.
  • Recyclable: Aluminum is a recyclable material, making it an environmentally friendly choice.

Cons of Aluminum:

  • Cost: Aluminum can be more expensive than wood, especially for larger boats.
  • Coldness: Aluminum can feel cold to the touch in colder weather. This can be a drawback if you plan on hunting in frigid temperatures.
  • Noise: Aluminum can be noisy when the boat moves, which can scare away ducks. This can be addressed with sound-dampening materials, but it adds to the overall cost.

Fiberglass: Strong, Smooth, and Sleek

Fiberglass is known for its strength, durability, and smooth finish. It's a popular choice for duck boats because it's lightweight, watertight, and can be molded into complex shapes.

Pros of Fiberglass:

  • Strength and Durability: Fiberglass is very strong and resistant to dents, scratches, and water damage. It’s also resistant to rot and corrosion.
  • Lightweight: Fiberglass is lightweight, which can improve your boat's performance and handling.
  • Watertight: Fiberglass is inherently waterproof and can be sealed to prevent leaks.
  • Customization: Fiberglass can be molded into complex shapes, allowing you to create a boat that meets your specific needs.

Cons of Fiberglass:

  • Cost: Fiberglass is the most expensive material for duck boats. It requires specialized equipment and expertise to work with.
  • Difficult to Repair: Repairing fiberglass can be challenging. It usually requires specialized skills and materials.
  • Heat: Fiberglass can get hot in direct sunlight, making it uncomfortable to sit on in warm weather.

Choosing the Right Material for You

So, how do you choose the right material for your duck boat? Here are some factors to consider:

  • Budget: Wood is the most affordable option, followed by aluminum and then fiberglass.
  • Skill Level: Woodworking skills are required for a wooden duck boat. Aluminum and fiberglass require different skills and may require more specialized tools.
  • Desired Durability: Aluminum and fiberglass are more durable than wood.
  • Hunting Style: Consider where you’ll be hunting and the type of hunting you plan to do. If you’re hunting in rough waters or need a very light boat, aluminum or fiberglass might be a better choice. If you’re hunting in calmer waters, wood could be a good option.

Frequently Asked Questions

Q: Can I combine different materials in my duck boat?

A: Yes, you can! Combining materials is a common approach to building a duck boat. You could use a wooden hull with aluminum sides or a fiberglass hull with aluminum seats and trim.

Q: What are the best ways to protect my duck boat from the elements?

A: For a wooden duck boat, regular sanding, staining, and sealing are crucial. For aluminum, you can use a protective coating like a sealant or paint. Fiberglass should be protected from scratches and impacts.

Q: What kind of tools do I need for each material?

A: For wood, you'll need basic woodworking tools like saws, hammers, chisels, and a drill. For aluminum, you'll need tools for cutting and shaping metal, like a jigsaw, shears, and a welding torch. For fiberglass, you'll need a variety of tools for working with resin, including brushes, rollers, and gloves.

Building your own duck boat is a rewarding experience. With careful planning and research, you can build a boat that is both functional and beautiful. No matter which material you choose, enjoy the process and get out there and hunt!